
Introduction to Microsoft Word
Microsoft Office Word 2010 allows you to create and edit personal and business documents, such as letters, reports, invoices, emails and books.By default, documents saved in Word 2010 are saved with the .docx extension. Microsoft Word can be used for the following purposes:
- To create business documents having various graphics including pictures, charts, and diagrams.
- To store and reuse ready-made content and formatted elements such as cover pages and sidebars.
- To create letters and letterheads for personal and business purpose.
- To design different documents such as resumes or invitation cards etc.
- To create a range of correspondence from a simple office memo to legal copies and reference documents.
Ms Word Tutorial
This is a full and free computer course for Microsoft Word 2007 to 2016. It is designed for complete beginners
Get Started with Microsoft Word
This chapter will teach you how to
start a word 2010 application in simple steps. Assuming you have
Microsoft Office 2010 installed in your PC, to start word application,
follow the following steps at your PC:
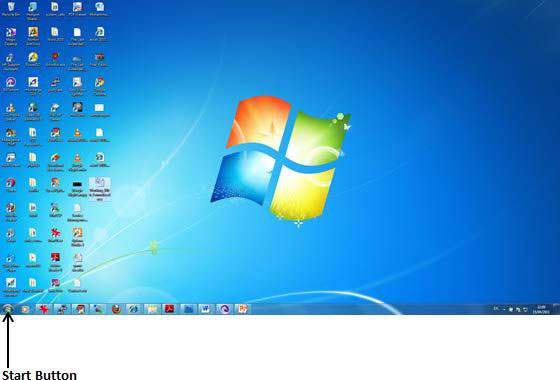
Step (1): Click Start button.
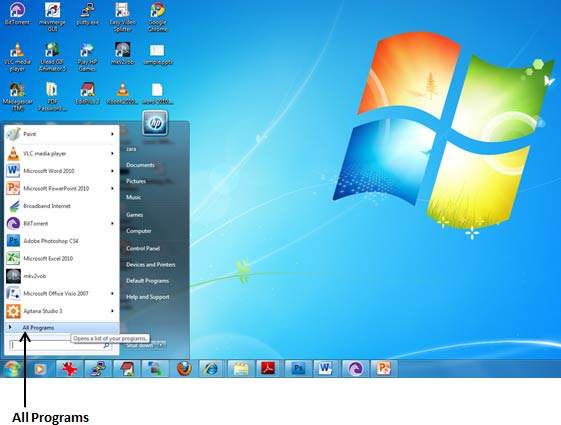
Step (2): Click All Programs option from the menu.
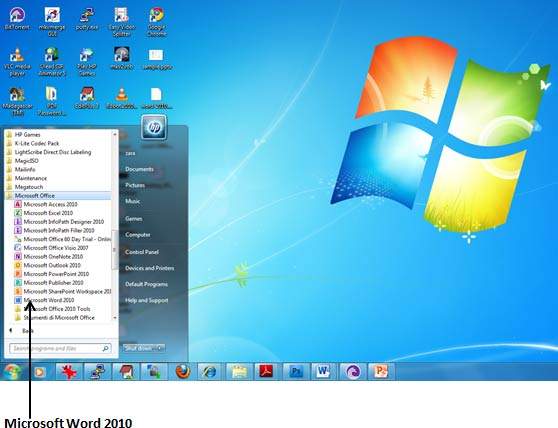
Step (3): Search for Microsoft Office from the sub menu and click it.

Step (4): Search for Microsoft Word 2010 from the submenu and click it.
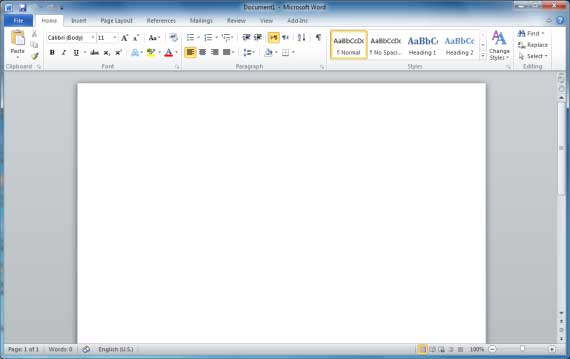
This will launch Microsoft Word 2010 application and you will see the following word window.
Basic Editing and More editing features
Formatting (Paragraph, Alignment etc)
Moving and Copying
Table Formatting
Bullet and Numbering
Border and Shading
Clip art and image
Drawing
Page break and Create section
Template
Mail Merge
To use Mail Merge


- Select the Mailings on the Ribbon.
- Select the Start Mail Merge command.
- Select Step by Step Mail Merge Wizard.
Steps 1-3
- Choose the type of document you want to create. In this example, select Letters.
- Click Next:Starting document to move to Step 2.
- Select Use the current document.
- Click Next:Select recipients to move to Step 3.
- Select the Type a new list button.
- Click Create to create a data source. The New Address List dialog box appears.
- Click Customize in the dialog box. The Customize Address List dialog box appears.
- Select any field you do not need, and click Delete.
- Click Yes to confirm that you want to delete the field.
- Continue to delete any unnecessary fields.
- Click Add. The Add Field dialog box appears.
- Enter the new field name.
- Click OK.
- Continue to add any fields necessary.
- Click OK to close the Customize Address List dialog box.
To customize the new address list:
- Enter the necessary data in the New Address List dialog box.
- Click New Entry to enter another record.
- Click Close when you have entered all of your data records.
- Enter the file name you want to save the data list as.
- Choose the location where you want to save the file.
- Click Save. The Mail Merge Recipients dialog box appears and displays all of the data records in the list.
- Confirm that the data list is correct, and click OK.
- Click Next:Write your letter to move to Step 4.
Steps 4-6
- Write a letter in the current Word document, or use an open existing document.
To insert recipient data from the list:
- Place the insertion point in the document where you want the information to appear.
- Select Address block, Greeting line, or Electronic postage from the task pane. A dialog box with options will appear based on your selection.
OR
- Select More Items. The Insert Merge Field dialog box will appear.
- Select the field you want to insert in the document.
- Click Insert. Notice that a placeholder appears where information from the data record will eventually appear.
- Repeat these steps each time you need to enter information from your data record.
- Click Next: Preview your letters in the task pane once you have completed your letter.
- Preview the letters to make sure the information from the data record appears correctly in the letter.
- Click Next: Complete the merge.
- Click Print to print the letters.
- Click All.
- Click OK in the Merge to Printer dialog box.
- Click OK to send the letters to the printer.
The Mail Merge Wizard allows you to complete the merge process in a variety of ways. Thebest way
to learn how to use the different functions in Mail Merge is to try to
develop several of the different documents—letters, labels, and
envelopes—using the different types of data sources.
No comments:
Post a Comment